Total Pageviews

Wednesday 14 September 2011

Setting the Timing on assembly

SORRY FOR THE DELAY OF THIS POST I HAVE BEEN VERY SICK.


Setting the timing on these old machines is a relativly simple process. The first part is the alignment of components in their original place on manufacture. Singer was very clever about this part for their production line assembly workers. Most of the working parts will only fit on each other one way and score lines are included for the parts that have scope to be placed in wrong.  See pictures below.


When all of the parts are possitioned the needle would be at its lowest point.


I will include more on timing in my next post.

Monday 5 September 2011

Head Assembly

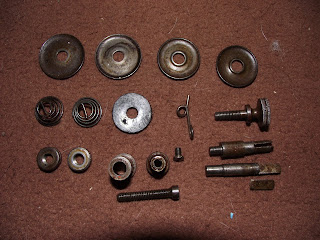
I have lubricated all of the parts after cleaning and laid them out ready for assembly.

If you follow the pictures you will see how easy the assembly is.


This top plate lines up and has a slight overlap.


Make sure everything is lined up before inserting the rod.


Above: When inserting the rod the stepped edge faces outwards.


The retaining pin is tapered which is something to watch when inserting it.


Finally the tubular rod is inserted through the centre of the head.

Saturday 3 September 2011

Re-spray and Head Assembly

I have now applied the final coat of paint to the singer arm and the time has come to star work on the head.


This is where lots of decent pictures pay off! I like to take pictures of all the parts whilst they are still attached and as shown below the parts layed out as this helps with accounting for them.


Below is is the head with one undercoat (a long way to go!)


It's important to remember that all of the components are machined so you have to be careful when cleaning them as you don't want to generate wear yourself. I find this part of a restoration the most enjoyable as it's guts of the machine. I will cover the assembly of the head after cleaning in more detail on the next post.

Singer Arm Work

To me the decals are as important as the paint work so its important to match it all up as it was when this machine came off the production line. (I will cover the decals in a later post) Much the same as before I am stripping the arm back to bear metal and building up the undercoat so that I can re-attach it and put the finish coat on.


I will begin to cover the moving parts in my next post before covering assembly.

Friday 2 September 2011

The Strip down, Prepation and Paint begins

I started to dismantle this machine beginning at the top with the tallow tray and working in a logical sequence down the machine. Attention to detail with a camera is the secret to a good re-assembly and bagging the parts in their respective groups. This leaves you with manageable sized workloads.


I find it’s very important that you keep all parts even if some are broken as this will aid replacing them with old stock parts or when fabricating new ones. I like to ensure that my workload bags are relevant parts and that there isn’t too much in each bag.


After stripping all the parts of I was left with the shell of the machine. Now this was a challenge because its 100 year old cast iron and paint work can hide a multitude of sins. I used a compressed air sprocket gun with a screwdriver attachment to remove the retaining screws out of the base CAUTION BE VERY CAREFUL cast iron is very brittle.  Once the shell was apart I photographed the decals recorded their measurements then stripped the metal bear.


I have deliberately scratched up the metal to give the undercoat a good surface to stick to. The scratches don’t have to be very deep but sufficient enough for the job.


I am using black Hammerite (brush painted on) as my undercoat because of its strength. I apply a coat leave it over night then sand the next day and repeat this process four times. What you end up with is a very hard layer of paint. The properties are excellent as this is an outdoor brand.

I got on with cleaning up the retaining screws as these have clearly had a hard life.


Once this was complete I re-attached the two base pieces.


 You can see fourth layer of Hammerite paint before sanding.

More coming soon!


Starting Out

Much like a lot of people I have been looking for a decent Singer 29k for while but with no success. I stumbled across one on E-bay that seen better days so I took the plunge and bought it. The description was fair and I knew that it potentially was a non runner as it came from a house clearance. After an eight hour round trip I finally got it home and tested it. The Singer really had seen better days so I tried to find a definitive repair guide or restoration page, again fail so I'm working through this one on my own. I have to say that I have restored Singers before (not this model) so I'm going to lean on this experience.

 This machine was completely seized and there is a serious rust issue. In the next post I will dismantle the machine.